
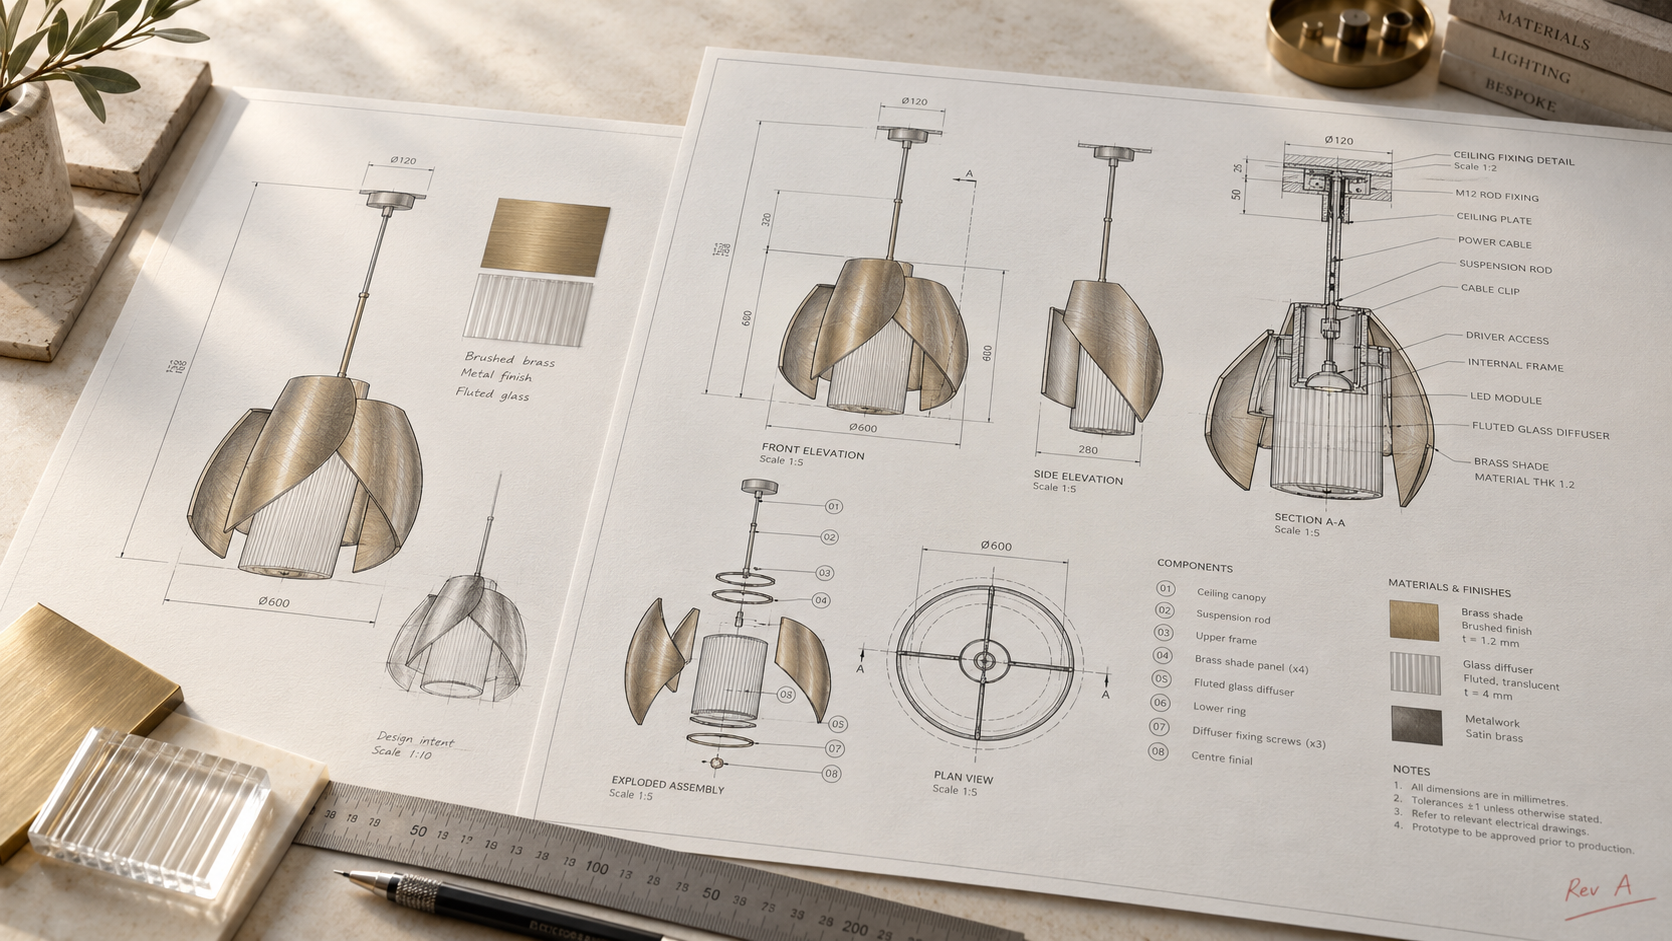
A reference image can communicate the atmosphere of a lighting design. It rarely explains how the fitting will be assembled, connected, adjusted or maintained.
That is where custom lighting shop drawings become important.
For bespoke decorative lighting, a shop drawing translates the design into dimensions, components and construction details that can be reviewed before manufacture. It gives the designer, manufacturer and installation team a shared reference—and an opportunity to resolve questions while changes are still manageable.
A useful review goes beyond whether the drawing looks like the original concept. It asks whether the proposed fitting will work in its intended position.
1. Check what each dimension actually measures
An overall height can mean different things unless its reference points are clear.
For a pendant, distinguish between the height of the decorative body and the total suspension height. Confirm whether the measurement includes the ceiling canopy, and whether the suspension is fixed, adjustable or intended to be shortened during installation.
For a wall light, the front elevation is only part of the picture. Projection from the finished wall, backplate dimensions and the position of the light source may affect its relationship with a headboard, mirror or nearby joinery.
For example, two reading lights can have the same backplate dimensions but very different reach once their arms are extended.
The drawing should make these relationships understandable through appropriate views and clearly labelled dimensions. Dimensions that depend on site conditions should be identified for confirmation, rather than treated as settled assumptions.
2. Review installation alongside appearance
A neat front view does not necessarily mean that installation has been resolved.
The drawing should show the proposed mounting arrangement, fixing positions and cable entry. Where a fitting interfaces with a recessed box, ceiling opening or joinery panel, those interfaces need to be coordinated with the relevant site information.
Consider how the installer will actually reach the fixing screws. A concealed fixing may look preferable, but it still needs a practical assembly sequence.
A recessed reading light illustrates the point. The visible faceplate might suit the design, while the available cavity behind it is too shallow for the proposed components. Identifying that conflict during drawing review allows the arrangement to be reconsidered before the wall or joinery is finished.
For heavy or large suspended fittings, fixture weight and suspension positions also need to be communicated. The adequacy of the building support and site fixings should be confirmed by the responsible qualified project professionals; a product drawing alone does not establish that suitability.
3. Confirm the light source, driver and control requirements
“LED” and “dimmable” are not complete electrical specifications.
Depending on the fitting, the information to confirm may include the lamp holder or LED module, colour temperature, supply requirements, driver arrangement and intended control method.
For a replaceable lamp, check that the proposed lamp shape and dimensions fit within the shade and allow access for replacement. Selecting a lamp holder does not, by itself, confirm that every lamp with that base will fit.
For integrated LED fittings, identify whether the driver is housed within the luminaire or located remotely. A remote driver also needs an agreed, accessible location and coordination of the connecting cable with the selected equipment’s requirements.
Dimming compatibility should be checked against the actual lamp or driver and control equipment, rather than assumed from a general description. Manufacturers such as Lutron provide compatibility guidance for this reason. Lutron lighting controls and compatibility guidance
The drawing and electrical specification should agree. Where a component remains undecided, mark it as an open item.
4. Make movement and everyday use explicit
Adjustable fittings deserve particular attention because a static drawing can conceal an important misunderstanding.
An arm that pivots in one vertical plane is not the same as a joint that moves freely in several directions. Both may be described informally as “adjustable”, but they offer different movement and require different construction.
For reading lights and adjustable lamps, clarify the intended direction and range of movement, how the position is held, and where the user operates the adjustment.
Switch details should be equally specific. Confirm its location and function: push on/off, touch control and dimming should not be treated as interchangeable descriptions.
These details may appear small on the drawing, but they shape how the guest uses the fitting every day.
5. Look at assembly and future maintenance
The fitting should be considered as an assembly, not just a finished silhouette.
How is the glass retained? How does the shade attach? Which parts can be removed, and in what sequence?
Where relevant, the drawings should identify access to replaceable light sources, drivers and decorative components. If a component is permanently bonded or sealed, that should be understood rather than mistaken for a removable connection.
This review also helps explain visible details. A small retaining screw or fixing point may have a necessary mechanical function. If its appearance is a concern, discuss the construction before removing it from the drawing.
The aim is to resolve appearance and assembly together.
6. Use samples for what drawings cannot communicate
Drawings can identify materials and finish references. They cannot fully communicate surface texture, sheen or the way a translucent material behaves when illuminated.
A finish note should therefore refer to an agreed sample or specification where appropriate. Glass texture, shade diffusion and natural material variation may also need physical review.
Our article, Why “Antique Brass” Is Not a Complete Finish Specification, explains why a finish name alone leaves room for different interpretations.
Drawings and samples answer different questions. Neither should be expected to replace the other.
7. Close the review with one clear revision
Comments often arrive through marked-up drawings, emails and messages. Before production release, consolidate them into a clearly identified drawing revision and supporting specification.
Check that the latest dimensions, components and agreed changes are reflected consistently. List unresolved items explicitly, and distinguish approval to make a sample from approval for bulk production.
Drawing approval is an important coordination step. It does not replace applicable product testing, compliance checks or installation requirements.
A clearer drawing supports a clearer project
The value of a shop drawing is not the number of notes it contains. It is whether the people reviewing, making and installing the fitting can understand what has been agreed.
At Covetstar, technical coordination is part of our bespoke lighting development process: bringing proportions, metalwork, decorative materials and practical construction into the same conversation.
Have a reference image, drawing or lighting specification? Discuss your project with us.